how to, server, technology, tips & tricks

VMWare: Temporarily Mount Your Shared Folders To Your Guest OS

When working with your VMWare machine, you will be faced with file exchanges from your host OS to your guest OS. Now, VMWare folder sharing in Windows environment is way easy. Unix or Linux guest operating systems, however, will require you to mount your host shared folder(s) to your guest OS.

This article will guide you to mount your host OS shared folders to your Unix/Linux guest OS.

Steps:

  1. In your Unix/Linux guest OS, login as ‘root’ and create your mount directory:

vm1     In this example, I’m creating a directory called ‘shares’ in the root of my Linux filesystem.

2. In your VMWare menu options, go to the virtual machine Sharing menu and add your host OS folder:

vm2     In my example, I want to share the ‘Downloads’ folder of my Macbook to my Linux guest OS.

3. Go to your guest OS, in my example, in my Linux guest OS, open a Terminal session. Login as ‘root’ and mount the ‘Downloads’ folder to my Linux ‘shares’ folder:

vm3

Do note that this type of mount is just temporary. When I reboot my virtual machine, this mount will be gone.

IMPORTANT NOTE:  The default location for your mounted shared folder(s) will be in /mnt/hgfs. Regardless of reboot, you will still able to access your shared folder(s) in that location.

4. After you mounted your shared folder, verify that it is successful.

vm4
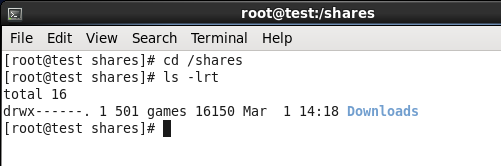
5. That’s it, you have successfully mounted your host OS shared folder(s) to your Unix/Linux guest OS.

So why would you need to do this if you can access your shared folder(s) in /mnt/hgfs?

There are scenarios when you want to control where you want to access your shared folders. Sometimes, the administrator restricts the permission of /mnt/hgfs if there are too many shared folders.


‘Til next time. Au revoir.

how to, server, technology, windows

Building Domain Controller For Windows 2008 Server

Lots of features has been added since I handled and administered Windows NT Server.

Now, the concept of Primary and Backup Domain controllers were replaced with the introduction of Windows Forests. Both or multiple domain controllers are active and supports the highly available AD authentication of users.

Creating of domain controller in Windows 2008 are now as follows. The steps provided here are for building a simple domain controller or in short — promoting an ordinary Windows 2008 server to be a domain controller. In production environment, of course there should be a proper design to support the service level agreement (SLA) required by the business and operations.

1. Run the dcpromo.exe from command:

2. The Active Directory Domain Services wizard will appear to assist you in building your domain: 

3. Specify whether this domain controller will be a member of an existing Forest or this is the first DC of new Forest:


4. Since I’ve chosen a new Forest, I have to specify my Forest Root Domain Name. The forest root domain name must be fully qualified.

5.  Set your Forest functional level. Do note that each release of Windows operating system adds up new features supported by the Forest.

For more information about the Forest features on different editions of Windows, refer to this link summary.

6.  Choose the functional level of your domain controller. Remember that the function level chosen here affects the addition of your domain controllers. This supports upward compatibility. Meaning, when I choose Windows 2008, I can only add another domain controller of Windows 2008 and later.

7. Additional DC options would provide you the chance of configuring this DC to be the DNS server as well. If you already have a DNS server, you can introduce the DNS server to this DC at a later time.

For the DC that I’m building, I’m configuring it to be the DNS server as well.


8. Specify the location of your database data and log files. As recommended, put it in a separate drive with hard disk configured for RAID 1 (Redundancy).

9. When your DC becomes unavailable due to planned and unplanned downtime, you will need to start the DC in restore mode. Restarting the DC is restore mode makes the DC locally available. As such, you will need to specify the DC Restore Mode Admin password.


10. Finalizing your DC Configuration:

11. Configuring your Domain Controller.

12. Active Domain Services is now installed.

13. Restart your machine and login as the Domain Controller Administrator.

Til next time. Au revoir.